How to get your team set up with Daycast & tracking time to FreshBooks
/If you use FreshBooks or are thinking of using FreshBooks, you’re already keenly aware of how valuable your time is. That’s why we think Daycast is an excellent fit for your less-tedium-more-fulfillment-please style. With Daycast, you and your team enjoy greater productivity thanks to mindful day planning, greater focus thanks to effortless time tracking, and greater cooperation thanks to easy team transparency… all with frictionless, one-click delivery of time entries to FreshBooks. And you can forget hiring a consultant or attending a webinar just to get up and running. We’ll have you planning, tracking, and sending your time to FreshBooks by the end of this blog post.
Let's get started.
Step 1: Download Daycast and create your admin account.
If you’re already using Daycast, skip ahead to step two. Otherwise, head over to the download page, download for either Windows or Mac, and follow the instructions to install (you’ll see those after clicking the download button). Once installation is complete, open Daycast and create your account by providing a first name, last name, email address, and your acceptance of our Terms of Service. Click Create Account and you’ll be logged into Daycast.

Step 2: Integrate your FreshBooks account.
Before you bring the rest of your team onboard, go ahead and integrate your FreshBooks account with Daycast. (Not a FreshBooks user yet? Start your free trial here.)
First, click the vertical ellipsis in the upper right corner of your Daycast app.

Choose Integrations from the menu, then click in the FreshBooks configuration row to expand it. When you click the Add Integration button, a browser window will open prompting you to log into your FreshBooks account. After you've entered your login credentials, you'll need to give Daycast permission to post time to FreshBooks by clicking Allow Access in the resulting window. Once you do, you should get a message there in your browser indicating that Daycast and FreshBooks have successfully synced. Head back to Daycast, where your FreshBooks projects are now available for time tracking.

Step 3: Invite your team to Daycast.
Already got your team on Daycast? Skip ahead to step four. Otherwise, read on....
In the left panel of your Daycast, you'll see a small plus sign next to the words: Invite teammate.

Click there and a small pop-up window will open. Enter your team member’s name and email address, then click the invite button. Do this as many times as you need to in order to get invites out to your whole team. (You’ll be billed for active users, not invited ones.)

Each recipient will then need to check their inbox for an email with the subject line, “Your invitation to Daycast” and follow the link within in order to become a member of your Daycast team.

Once they’ve joined, you’ll be able to see every team member’s current status right from your own day plan and get a complete view of the tasks and projects they’re preparing to work on by clicking each name in the side panel to navigate to their respective day plans. Everyone on the team enjoys this same degree of visibility—Daycast makes transparency easy!
Step 4: Ask your team to integrate their FreshBooks accounts.
Each team member will then integrate FreshBooks with Daycast the same way you did, only with their own FreshBooks credentials instead of yours. As soon as their account is created, each team member will receive an email welcoming them to Daycast and pointing them to the integration guides, which will walk them through the process.

Step 5: Plan, track, and send time to FreshBooks.
Now that you’ve got your team set up, you’re ready to start using Daycast and FreshBooks together.
To get the most out of Daycast, we recommend dedicating a few minutes at the end of each day to planning your work for the next one. But no matter when you plan your days, the process is the same:
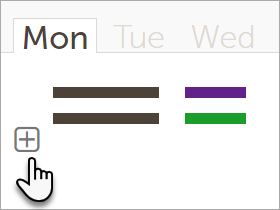
Click the plus icon at the top of your day plan, beneath the days of the week.
Type the task you want to work on.
Open the dropdown menu to the right of your newly typed task and select the FreshBooks project associated with it.
Repeat as needed until you’ve got your day planned.
Clock in and out of tasks as you work through your day, then click Away (just above your name in the left panel) to clock out.
Click Finalize Day to send your time to FreshBooks.

All of the time tracked against FreshBooks projects in Daycast will collect in FreshBooks. When you’re ready to bill for your time, simply create your invoice in the usual way.
That's all there is to it.
Need help?
Anyone on your team can contact us with questions, issues, or feature requests by emailing support@daycast.com. We check our email regularly and will get back to you within one business day (it almost never takes us that long). If you’d prefer to be contacted by phone, please indicate that in your email along with the best number/day/time for us to call. In the meantime, check out the FreshBooks FAQ for more help using Daycast with FreshBooks. Happy ‘casting!
Top photo by rawpixel